
I've been reading through the forums at Artfire to learn everything I can about setting up an online shop. I've discovered that there are three main components to a successful shop:
1. Great product.
2. SEO (Search Engine Optimization) Basically, keywords. I need to have the right keywords to show up on search engines.
3. Amazing pictures
I have a good product, and SEO will take time, trial and error to master, but I can do awesome pictures!
Except, my current pics aren't great.

The background is the focus, the actual item is too dark, and not enough detail is shown.
So this was my project today:
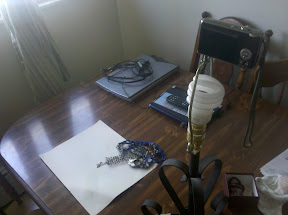
Welcome to my new "photo studio". Yes, my camera is actually screwed onto a lamp. It's a quick and dirty way to get a clear picture without using a tripod, mostly because I can't find mine. There's also some white cardstock, which was my background, and a jumble of pretties that I had just finished photographing. Please ignore the scanner; that's my husband's. For some reason his office type stuff always ends up on my table.
1. Great product.
2. SEO (Search Engine Optimization) Basically, keywords. I need to have the right keywords to show up on search engines.
3. Amazing pictures
I have a good product, and SEO will take time, trial and error to master, but I can do awesome pictures!
Except, my current pics aren't great.

The background is the focus, the actual item is too dark, and not enough detail is shown.
So this was my project today:
Welcome to my new "photo studio". Yes, my camera is actually screwed onto a lamp. It's a quick and dirty way to get a clear picture without using a tripod, mostly because I can't find mine. There's also some white cardstock, which was my background, and a jumble of pretties that I had just finished photographing. Please ignore the scanner; that's my husband's. For some reason his office type stuff always ends up on my table.
This is that same necklace, photographed today in my "studio".

Here's how I did it:
1. Used a tripod, or in this case, a lamp. The point is, your camera needs to be rock-solid steady or you'll get blur. Blur is bad.
2. Took advantage of natural light. I took the pictures around 11 a.m. and did not use a flash.
3. White balance. I have a point and shoot camera (Panasonic Lumix, don't remember the model number but it's 8mp) and I went into settings > White Balance > set and focused on the white paper to set it. Having the proper white balance helps remove odd, unwanted tints from your picture.
4. Set the camera to MACRO. (This is the little flower setting) It captures the most detail and is to be used for closeups only. (Less than 24")
5. Didn't use zoom, just took the pictures close to the object to allow for as much detail as possible. If you do use zoom, don't use digital zoom. That will make your pictures fuzzy, or add "noise".
6. Finally, I took several pictures of each object, from each angle. That way, even if I got a bad picture I wouldn't have to reset everything up to try again. Hopefully.
Everything I've learned about taking pictures has been through trial and error and perusing blogs and websites. Hopefully this has saved you a little time and a few errors. :)
Awesome!! Thanks so much for the needed info..I'll try your tripod idea :)
ReplyDeleteTonya @facebook.com/BeDazzledJewelry