I can't seem to stop making these bangles! First there were simple beaded ones in saturated colors, like these ones. I've got most of the rainbow here! This rainbow is available individually or as a set of cool blues (the bottom three) or hot tropics (the top three). I've found that they're a lot of fun to stack for more visual impact.
I beaded each one with matching glass seed beads because I can't seem to make "plain" anything.. Next, somebody wanted crystals instead of beads for extra sparkle, so these ones appeared. They're my favorite so far, and I can't wait to do more with these larger crystals.
Finally, someone else thought that a charm bracelet made with this technique would be a great idea, so she picked the charms and I knitted them, along with some Swarovski crystals, to form this set of bangles.
They're pretty easy to make, and definitely fun to wear! I'm wondering if anyone would be interested in a tutorial or pattern to make your own, or perhaps a kit with all of the supplies, as well as directions? Please comment with your thoughts. :)
In the meantime, I'm working on a special project. Every year, one of the churches in my area hosts a Mother's Day Tea, and part of the festivities includes a raffle of a variety of products and services. There has been everything from a movie night basket, to Avon products, and even a full photography shoot donated by a local photographer. I'm making this set of bangles for the event:
Time to chug some coffee and get knitting.
Showing posts with label designing. Show all posts
Thursday, May 10, 2012
Tuesday, July 5, 2011
you're worth it (and I am, too)
Pricing.... it's the MOST difficult part of online selling for me. I started out pricing things to cover the cost of materials with a little profit, but hadn't included much for my time or even thought about wholesale pricing. After asking for help and input on my studio on the Artfire forums, I was given some helpful advice.
1. Lower my shipping charges (Originally $6 for the first item, $2 or $3 for the second, can't remember exactly). I've since dropped that to $3.00/$1.00 with positive results.
2. Raise my prices. What??? Several artisans mentioned that my prices made them think that my work was cheap or not well made, even though it is neither. I was kind of shocked by that, but after checking out similar items from amazing artists like YooLa and Lapis Beach, I was forced to agree and have done as they suggested.
3. Retake some of my pictures. Some of the older pictures were blown out in my attempts to get a bright picture with as much detail as possible. I've since gotten a better camera and am slowly reshooting the offending pictures.
Since receiving that critique I've searched through Google, Artifre forums, and Etsy forums to figure out a better pricing system. Here are some helpful articles and formulas I've found.
* More thoughts to consider
* Detailed article with several pricing formulas
* Talking about Worthsy and why they started it, such a great idea!
* Worthsy - pay more, get more. A special auction site for handmade
Taking a moment here to say how much I love, love, love the concept of Worthsy. I think that as word spreads about this fabulous site, the value of hand made will be better understood, and perhaps artisans will stop devaluing themselves. A friend sent me a link to an artist on Etsy who created wire knit jewelry as I do, but wasn't even charging enough to cover the cost of materials, let alone the time invested. It saddened me because they were hurting themselves and other artists who are charging a fair price.
Also, this week's featured item, a magnetic spice rack from Salt City Spice, matches my kitchen exactly, and it's functional art. I just decided that I need a new spice rack, hehe.
All of this brings me to my most recent endeavor, cotton teddy bear hats. I posted this picture and a brief blurb about them on my facebook page and got an almost immediate response. Someone wanted to know how much they were. Good question. When I first made them I wanted to price them at $20, since that was more in line with hats I've made in the past. But, after wrestling with those adorable ears for several hours, (I make my own patterns and those ears were surprisingly tricky) I realized that that wasn't enough to compensate for my time. Even after making several hats, the ears still add another hour to the time it takes to make one. *sigh*.
But... is that a price that the market will bear? (because it doesn't matter if I'm charging $10 or $100, if no one buys) By doing market research I found that most similar hats were priced between $20 - $40, with the average being around the $25 mark. So, on target for me. Time will tell if lovers of BooJay will agree with my market research and time invested.
I hope this has helped you in some way, whether it gave you a better understanding of what goes into that cute hand made item at your local craft fair or online, or as an artist, to give you confidence to price your items what they're worth.
1. Lower my shipping charges (Originally $6 for the first item, $2 or $3 for the second, can't remember exactly). I've since dropped that to $3.00/$1.00 with positive results.
2. Raise my prices. What??? Several artisans mentioned that my prices made them think that my work was cheap or not well made, even though it is neither. I was kind of shocked by that, but after checking out similar items from amazing artists like YooLa and Lapis Beach, I was forced to agree and have done as they suggested.
3. Retake some of my pictures. Some of the older pictures were blown out in my attempts to get a bright picture with as much detail as possible. I've since gotten a better camera and am slowly reshooting the offending pictures.
Since receiving that critique I've searched through Google, Artifre forums, and Etsy forums to figure out a better pricing system. Here are some helpful articles and formulas I've found.
* More thoughts to consider
* Detailed article with several pricing formulas
* Talking about Worthsy and why they started it, such a great idea!
* Worthsy - pay more, get more. A special auction site for handmade
Taking a moment here to say how much I love, love, love the concept of Worthsy. I think that as word spreads about this fabulous site, the value of hand made will be better understood, and perhaps artisans will stop devaluing themselves. A friend sent me a link to an artist on Etsy who created wire knit jewelry as I do, but wasn't even charging enough to cover the cost of materials, let alone the time invested. It saddened me because they were hurting themselves and other artists who are charging a fair price.
Also, this week's featured item, a magnetic spice rack from Salt City Spice, matches my kitchen exactly, and it's functional art. I just decided that I need a new spice rack, hehe.
But... is that a price that the market will bear? (because it doesn't matter if I'm charging $10 or $100, if no one buys) By doing market research I found that most similar hats were priced between $20 - $40, with the average being around the $25 mark. So, on target for me. Time will tell if lovers of BooJay will agree with my market research and time invested.
I hope this has helped you in some way, whether it gave you a better understanding of what goes into that cute hand made item at your local craft fair or online, or as an artist, to give you confidence to price your items what they're worth.
Wednesday, June 8, 2011
Knit Wire Earrings Tutorial and Pattern
Edit 2-12-12 The PDF for the tutorial and pattern is now avalailable! Click the "buy now" button. Don't worry, it's still free. :)
*** Extremely picture heavy post!!***
If you have any questions please contact me at boojayknits@gmail.com. Thanks!
| Regatta Blue Chip Earrings |
Materials:
26 gauge wire – I used silver colored non tarnish artistic wire, found at www.fusionbeads.com
20 stones or beads – I’ve used 4 mm Swarovski crystals, size 6 seed beads, and small stone chips. Choose what makes you happy.
Size 3 knitting needles
2 jump rings
2 ear wires
Note: gauge is not important for this project
Tutorial:
1. Gather your materials
Row 1: dark, light, dark, light, dark (The middle dark chip was slightly bigger and longer than the rest) Row 2: light, dark, light, dark, light
3. String your beads on your wire in your chosen order, starting from the second or top row. String both rows from right to left of your chosen order. In other words, opposite order of your desired pattern.
4. Knit just as you normally would. (This is where the pattern comes in) If you don’t know how to knit but want to try these, I highly recommend www.knittinghelp.com for how-to videos. You will knit with the wire exactly as you would knit with yarn.
Tips:
| Give your work a firm tug! |
· Tug your work HARD after each row. This is the blocking process for wire. You can shape the project when you’re done, but will have a neater result if you block as you go.
· Pull the working wire firmly down after each stitch. This will help to create uniform stitches.
· When adding a bead keep it as close to the stitch just worked as possible. (The stitch on your right needle) and knit the next stitch as tight as you can.
· The beads will show up best on the purl side of the work.
Pattern: (Make 2)
Cast on 6 stitches using the backwards loop method in this way:
Cast on 1 stitch, *bring 1 bead up tightly to the right needle, cast on 1 stitch* 5 times
| Bring bead flush to stitch |
| Knit next stitch, keeping the bead between stitches |
Row 1 (right side) knit
Row 2: Knit 1, *Bring 1 bead up tightly to the right needle, knit 1* to end
Knit 2 rows
| Knit 2 tog |
Next row: Knit 2 together (K2TOG) Knit 2, K2TOG – 4 stitches
Knit 4 rows
Next row: K2TOG twice – 2 stitches
Remove needle from the stitches (don’t worry, they’ll stay put) and trim the wire, leaving a 4” tail. Squeeze the stitches together so they look like one stitch, making sure that they stay open so the jump ring will fit through.
Thread the wire through both remaining stitches, then wrap several times just below the stitches. Trim flush with the work and bend the tail so that it doesn’t stick out. (No weaving in of ends required.)
| Slide jump ring through loops and jump ring |
| Wrap the tail around the top stitches |
Open 1 jump ring and slide through the stitches. Slide the ear wire onto the jump ring as well, and then close the ring.
Twist the knitted portion as necessary until it will hang with the beads in the front when the earrings are worn. Thread the cast on tail through a stitch, trim it flush with the work, and bend to hide it.
Tuesday, May 17, 2011
"Sea-ing" Green
| Catching the morning light |
| A view from the top |
| Pretty clasp to finish it off |
The funny thing is, I've has a little summer cardigan in actual yarn on my needles for weeks now, but I keep getting distracted by the wire. And beads. Oh and the pearls!! Loooove the pearls. As my adorable niece would say, "Vewwwwwy niiiiiiice!"
Wednesday, April 27, 2011
Berries N Cream
FYI I've been working on this post since Monday!! Unfortunately cranky babies who are teething and not feeling well tend to be rather clingy. They also like computers and like to hit as many keys as they can reach... not good! So I haven't had much computer time lately.
I've recently joined a group on Facebook that does a color challenge each week. (Everyone makes something in a specific color combo in their medium of choice.) It's definitely gotten the creative juices flowing, and I love seeing what other artists come up with. I've been inspired to play with colors more than I had up until this point. This week's combination was a "Berries and Cream" theme. Pink, red, cream, and chocolate brown, how yummy!
This is what I came up with.
I strung copper wire with a random arrangement (I never do random! It was so fun.) of glass pearls, pink beads, and deep brown swarovski crystals, then knit it into a bracelet. The ends are tapered and its closed with a copper toggle clasp with a miniature rose detail. I sold it before I had a chance to take detail pictures, though, so this is the only one I have.
Here are a couple of my favorite entries for this particular color challenge. I have a thing for pearls, and the shimmery disks on the earrings are actually pearls!
My other favorite, also involving pearls, was this lovely from Sunshine Jewels. The closure is so modern and beautiful, don't you think?
I've recently joined a group on Facebook that does a color challenge each week. (Everyone makes something in a specific color combo in their medium of choice.) It's definitely gotten the creative juices flowing, and I love seeing what other artists come up with. I've been inspired to play with colors more than I had up until this point. This week's combination was a "Berries and Cream" theme. Pink, red, cream, and chocolate brown, how yummy!
I strung copper wire with a random arrangement (I never do random! It was so fun.) of glass pearls, pink beads, and deep brown swarovski crystals, then knit it into a bracelet. The ends are tapered and its closed with a copper toggle clasp with a miniature rose detail. I sold it before I had a chance to take detail pictures, though, so this is the only one I have.
Here are a couple of my favorite entries for this particular color challenge. I have a thing for pearls, and the shimmery disks on the earrings are actually pearls!
![]() |
| BigFatUselessCat Designs |
![]() |
| Sunshine Jewels |
Finally, if you need a place to keep all of your lovelies safe, check this out! Storage and display from Joyous World
![]() |
| Joyous World on Etsy |
PS If you would like a berries n cream bracelet of your own, I would love to make another just for you! email me at boojayknits@gmail.com. :)
Saturday, April 16, 2011
Success!
Ooooh... pretty! Here's another pic:
And one final one:
This is the finished result of the cuff I was working on earlier this week. I'm so happy with it, and unlike many other projects, it didn't require hours of tinkering, ripping out, or otherwise redesigning it.
The best part? Someone else loved it, too! It will soon be mailed off to its new home.
Success!
And one final one:
This is the finished result of the cuff I was working on earlier this week. I'm so happy with it, and unlike many other projects, it didn't require hours of tinkering, ripping out, or otherwise redesigning it.
The best part? Someone else loved it, too! It will soon be mailed off to its new home.
Success!
Thursday, April 7, 2011
Quick and Dirty Product Photography
I've been reading through the forums at Artfire to learn everything I can about setting up an online shop. I've discovered that there are three main components to a successful shop:
1. Great product.
2. SEO (Search Engine Optimization) Basically, keywords. I need to have the right keywords to show up on search engines.
3. Amazing pictures
I have a good product, and SEO will take time, trial and error to master, but I can do awesome pictures!
Except, my current pics aren't great.
The background is the focus, the actual item is too dark, and not enough detail is shown.
So this was my project today:

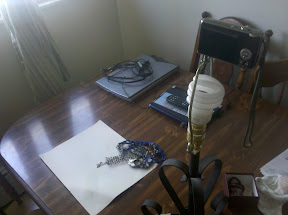
Welcome to my new "photo studio". Yes, my camera is actually screwed onto a lamp. It's a quick and dirty way to get a clear picture without using a tripod, mostly because I can't find mine. There's also some white cardstock, which was my background, and a jumble of pretties that I had just finished photographing. Please ignore the scanner; that's my husband's. For some reason his office type stuff always ends up on my table.
1. Great product.
2. SEO (Search Engine Optimization) Basically, keywords. I need to have the right keywords to show up on search engines.
3. Amazing pictures
I have a good product, and SEO will take time, trial and error to master, but I can do awesome pictures!
Except, my current pics aren't great.
The background is the focus, the actual item is too dark, and not enough detail is shown.
So this was my project today:

Welcome to my new "photo studio". Yes, my camera is actually screwed onto a lamp. It's a quick and dirty way to get a clear picture without using a tripod, mostly because I can't find mine. There's also some white cardstock, which was my background, and a jumble of pretties that I had just finished photographing. Please ignore the scanner; that's my husband's. For some reason his office type stuff always ends up on my table.
This is that same necklace, photographed today in my "studio".
Here's how I did it:
1. Used a tripod, or in this case, a lamp. The point is, your camera needs to be rock-solid steady or you'll get blur. Blur is bad.
2. Took advantage of natural light. I took the pictures around 11 a.m. and did not use a flash.
3. White balance. I have a point and shoot camera (Panasonic Lumix, don't remember the model number but it's 8mp) and I went into settings > White Balance > set and focused on the white paper to set it. Having the proper white balance helps remove odd, unwanted tints from your picture.
4. Set the camera to MACRO. (This is the little flower setting) It captures the most detail and is to be used for closeups only. (Less than 24")
5. Didn't use zoom, just took the pictures close to the object to allow for as much detail as possible. If you do use zoom, don't use digital zoom. That will make your pictures fuzzy, or add "noise".
6. Finally, I took several pictures of each object, from each angle. That way, even if I got a bad picture I wouldn't have to reset everything up to try again. Hopefully.
Everything I've learned about taking pictures has been through trial and error and perusing blogs and websites. Hopefully this has saved you a little time and a few errors. :)
Monday, March 21, 2011
Bling
This is my latest creation. I worked on it for most of last week, because I could only do it when my kids were asleep. The wire is too fragile to risk being tugged or twisted by little hands. The finished piece is delicate yet strong, and measures approximately 2" wide and 7.5" long measured from each clasp. The knitted portion is just over 6".
I tried to capture the shine of the piece, and the contrast of the black and silver. It's truly gorgeous! Try it... add a little shine to your next outfit with this one-of-a-kind bracelet. I can't wait to make this in other colors.
I would love to hear your suggestions for future color combinations! Do you have a favorite metal or color? Or maybe you have an outfit that needs that something. Maybe even a favorite sports team? (Black and gold, anyone??) Whatever it is, I'd love to hear it. :)
Tuesday, February 8, 2011
Pebbled Beret
Check out my latest addition, the Pebbled Beret. It has classic lines and plenty of texture. My favorite part is the top... I love the swirl the stitches make as they come together at the crown. It's supercute and suitable for a boy or a girl, although it's modeled in pink. Since my cutie is the model. :)
I guess I should try to fine tune my design process. My designs start out as an idea, like "Wouldn't Elise look awesome in a beret!" Then I knit for awhile, play around with stitch patterns and shapes, and assess my progress. This particular design was close to being finished several times but I didn't like the shape of the top of it (Too pointy, I didn't want an elf look this time.) Also, I played around with what type of texture stitch to use.
After some trial and error, the prototype is finally finished; all that's left is to snap some pics and work out the math required for making various sizes.
Sorry, I hope this description wasn't too boring. I know that I'm often interested in how other people come up with their designs, and I thought someone out there might feel the same way about mine. :)
For you knitters out there, this pattern is available for purchase. Get it here. :)
Tuesday, January 11, 2011
Brand new adventure
Welcome to BooJay Knits!
This blog is all about my adventures in designing beautiful knitted accessories. It all started shortly after I had my daughter in June 2010.
There is a huge trend right now for babies to wear large, colorful, flowered headbands. Many of my friends' babies had them, but the metal clips that attached the flower to the headband seemed uncomfortable, so I decided to design my own.
The other thing I am currently working on is jewelry. I adore textures, and often choose my ribbons and yarns based on how they feel. My jewelry is all about textures and contrast. A hard, shiny glass pendant suspended by a silky knitted cord, ribbon knit into a nubby textured cuff, or large pebbled beads strung on smooth satin.
Thank you so much for visiting, and I look forward to hearing from you!
Subscribe to:
Posts (Atom)