Showing posts with label tutorial. Show all posts

Wednesday, June 8, 2011

Knit Wire Earrings Tutorial and Pattern


Edit 2-12-12 The PDF for the tutorial and pattern is now avalailable! Click the "buy now" button. Don't worry, it's still free. :)


*** Extremely picture heavy post!!***

If you have any questions please contact me at boojayknits@gmail.com. Thanks!


Regatta Blue Chip Earrings

Materials:

26 gauge wire – I used silver colored non tarnish artistic wire, found at www.fusionbeads.com
20 stones or beads – I’ve used 4 mm Swarovski crystals, size 6 seed beads, and small stone chips. Choose what makes you happy.
Size 3 knitting needles
2 jump rings
2 ear wires
Note: gauge is not important for this project

Tutorial:

1.       Gather your materials


2.       Lay out your stones in the pattern that you desire. You will need 2 rows of 5 stones or beads. This was the color pattern I used with my stone chips:
Row 1: dark, light, dark, light, dark (The middle dark chip was slightly bigger and longer than the rest) Row 2: light, dark, light, dark, light


  3.      String your beads on your wire in your chosen order, starting from the second or top row. String both rows from right to left of your chosen order. In other words, opposite order of your desired pattern.


4.       Knit just as you normally would. (This is where the pattern comes in) If you don’t know how to knit but want to try these, I highly recommend www.knittinghelp.com for how-to videos. You will knit with the wire exactly as you would knit with yarn.


Tips:

Give your work a firm tug!
·         Tug your work HARD after each row. This is the blocking process for wire. You can shape the project when you’re done, but will have a neater result if you block as you go.
·         Pull the working wire firmly down after each stitch. This will help to create uniform stitches.
·         When adding a bead keep it as close to the stitch just worked as possible. (The stitch on your right needle) and knit the next stitch as tight as you can.
·         The beads will show up best on the purl side of the work.

Pattern: (Make 2)


Cast on 6 stitches using the backwards loop method in this way:   
Cast on 1 stitch, *bring 1 bead up tightly to the right needle, cast on 1 stitch* 5 times

Bring bead flush to stitch
Knit next stitch, keeping the bead between stitches


Row 1 (right side) knit
Row 2: Knit 1, *Bring 1 bead up tightly to the right needle, knit 1* to end

Knit 2 rows

Knit 2 tog
Next row: Knit 2 together (K2TOG) Knit 2, K2TOG – 4 stitches

Knit 4 rows

Next row:  K2TOG twice – 2 stitches

Remove needle from the stitches (don’t worry, they’ll stay put) and trim the wire, leaving a 4” tail. Squeeze the stitches together so they look like one stitch, making sure that they stay open so the jump ring will fit through.
   
Thread the wire through both remaining stitches, then wrap several times just below the stitches. Trim flush with the work and bend the tail so that it doesn’t stick out. (No weaving in of ends required.)


Slide jump ring through loops and jump ring
 
Wrap the tail around the top stitches


Open 1 jump ring and slide through the stitches.  Slide the ear wire onto the jump ring as well, and then close the ring.
Twist the knitted portion as necessary until it will hang with the beads in the front when the earrings are worn. Thread the cast on tail through a stitch, trim it flush with the work, and bend to hide it.

Thursday, June 2, 2011

Coming soon... a tutorial!

I apologize in advance, this post is coming out a little random. Hopefully the pictures will make up for it... or maybe you'll think I'm funny? Anyway...

I think this Memorial Day weekend might have been the first one during which I haven't knitted. Not once! I didn't even bring knitting on our camping trip. In the past I've considered it a personal challenge to complete an entire project over the "Camping weekends". Once I made a poncho, once a self-designed short-sleeved summer sweater. I've made other stuff as well, but those are the ones I remember.

Anyway. Tonight I finished a little summery project - a red, white, and blue bracelet. This was my first time using colored wire. Not the greatest pic, but I wanted  needed to write, so it will have to do. I think the blue wire would look better with purple or green beads, but then it wouldn't have been patriotic. :)

Also...
Would you like to learn how to make a pair of these? Do you know how to knit? Well, then you can do it! Much as I would like to tell you that knitting with wire is incredibly difficult and time consuming and your fingers will bleed (Because then you'd be more impressed with my pretties) It's just not true. OK so my fingers do ache after a while, but they do that after knitting with fiber (yarn) too.

When my husband looked at me like I was nuts as I was taking a picture, knitting a stitch or two and taking another, I told hime I was going to make a tutorial for these earrings. He said, "But then everyone will just make their own instead of buying yours!" Aren't you glad I didn't listen? (You are, right? You DO want to know how to make these pretty little earrings for yourself, don't you???? )

My goal is to have the tutorial up by the end of the week. First I have to finish the second earring, then take some more pics and edit them. Stay tuned!

Oh, and one more thing. One of the talented artists in the oft-mentioned CCC Facebook group has cancer, and the group is having an auction for her, because chemo isn't cheap. Also, it's a way to show her our love and support. It sounds like there will be many wonderful objects to bid on, and I'm thrilled to be offering a bracelet as well as the earrings I'm currently working on. So I guess I'd better get on that, because the entries are due tomorrow. Yikes!

:)

Thursday, April 7, 2011

Quick and Dirty Product Photography

I've been reading through the forums at Artfire to learn everything I can about setting up an online shop. I've discovered that there are three main components to a successful shop:

1. Great product.
2. SEO (Search Engine Optimization) Basically, keywords. I need to have the right keywords to show up on search engines.
3. Amazing pictures

I have a good product, and SEO will take time, trial and error to master, but I can do awesome pictures!
Except, my current pics aren't great.


The background is the focus, the actual item is too dark, and not enough detail is shown.
So this was my project today:

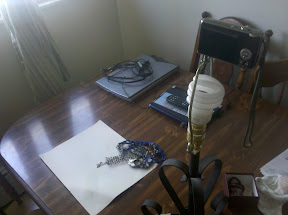
Welcome to my new "photo studio". Yes, my camera is actually screwed onto a lamp. It's a quick and dirty way to get a clear picture without using a tripod, mostly because I can't find mine. There's also some white cardstock, which was my background, and a jumble of pretties that I had just finished photographing. Please ignore the scanner; that's my husband's. For some reason his office type stuff always ends up on my table.

This is that same necklace, photographed today in my "studio".


Here's how I did it:

1. Used a tripod, or in this case, a lamp. The point is, your camera needs to be rock-solid steady or you'll get blur. Blur is bad.

2. Took advantage of natural light. I took the pictures around 11 a.m. and did not use a flash.

3. White balance. I have a point and shoot camera (Panasonic Lumix, don't remember the model number but it's 8mp) and I went into settings > White Balance > set  and focused on the white paper to set it. Having the proper white balance helps remove odd, unwanted tints from your picture.

4. Set the camera to MACRO. (This is the little flower setting) It captures the most detail and is to be used for closeups only. (Less than 24")

5. Didn't use zoom, just took the pictures close to the object to allow for as much detail as possible. If you do use zoom, don't use digital zoom. That will make your pictures fuzzy, or add "noise".

6. Finally, I took several pictures of each object, from each angle. That way, even if I got a bad picture I wouldn't have to reset everything up to try again. Hopefully.

 Everything I've learned about taking pictures has been through trial and error and perusing blogs and websites. Hopefully this has saved you a little time and a few errors. :)